Monday, December 31

CELEBRATION TIME!!! (Part 1)

Fifty and Fabulous!

No, not me! My latest newly published card! You can find it in Paper Crafts Magazine's special issue titled Card Creations: Quick & Easy. It's on page 76 in their section on Birthday Cards and it's called "You're 50."


The editors chose the "Gift" card from my "Birthday Bubbles" series of cards. (That's an earlier version of the published card in the photo above.) The card base is a piece of transparency film folded to form a square card. The rest of the card is very quickly assembled using some ribbon and a couple of squares and a rectangle cut from some festive double-sided cardstock. My Xyron machine was a big help with this series of cards. (Please see magazine for complete instructions.)

And here's a special bonus for you, my readers! What the magazine does not show is the inside (and punchline) of my "You're 50" birthday card.

Front of card: You're 50
Inside of card: That's 10 Celsius. Happy Birthday.


Hmmm... know anyone who acts their Celsius age instead of their Fahrenheit age??? Then this card would be perfect for them!

Bonus Tip! Need a card for a different age? Check out this Fahrenheit to Celsius Chart...
: : :

Well, this is my final post of the year. I would like to thank 2007 for being such a wonderful, creative, and productive year for me. And special thanks to all of my readers for all of your encouragement and support over the past six months. If it weren't for you, I wouldn't be blogging! Check back next year for additional how-to's from my Birthday Bubbles series, plus a whole lot more!

Hope you all have a Happy, Healthy, and Creative New Year! Thanks for reading!

~ Angela

Wednesday, December 26

Holiday Gift Packaging

Hope you all had wonderful holidays! I know I did! And now that the gift-giving is over, I can share with you a few of the projects that I created to wrap up some of my presents this year...

Guitar Gift Card Holder

This first one is a guitar shaped card that I used to hold a music store gift card. I used the pattern and instructions from PaperCrafts magazine's "Card Creations, Volume 5" issue. It is the card titled "Always in Tune" that Nichole Heady created for the Father's Day section. I love the realistic effect that Nichole achieved using the embroidery floss and mini brads!

I embellished Nichole's design with my own holly leaves to make it more appropriate to the season. I completed the holder by attaching the gift card to the inside with removable adhesive dots.

Finished size 4" x 5.5".
Additional photos in my online portfolio.

: : : : :

Holiday Gift Card Tins

These are two more CD tins that I altered to hold gift cards. I chose cardstock from Reminisce's Snow Globe collection. Similar to my "Hoppy Birthday" Gift Card Tin, I again used a paper sleeve to wrap the tin. And I finished both of them off with more of my personalized tags which I attached using colored safety pins.

For the "Blue Snowflakes" tin, I chose Reminisce's Snowglobe cardstock for my main patterned paper. I attached two layers of ribbon to the outer sleeve using eyelets and some adhesive. I embellished the cover using rub-ons and a plastic snowman.

For the interior of the cover, I again used the Snowglobe paper, and accented it with diecut stickers, green tree buttons and some more ribbon. For the actual gift card holder, I created a flapped pocket using Reminisce's Frosty Frame Up cardstock, and held the flap closed with a piece of Velcro. I wrapped the gift card holder with a length of ribbon and a plastic snowflake. Finally, I finished the look with some additional rub-ons.

For the "Red and Green Stripe" tin, I used Reminisce's Polarity patterned cardstock for the sleeve. I wrapped it with a length of gold ribbon tied in a bow. I again accented the cover with a rub-on.

I covered the inside of the cover with more Polarity cardstock and gold ribbon. I also added some plastic snowflakes and a diecut sticker. I created another flapped pocket from the Frosty Frame Up cardstock to hold the gift card, and used my slot punching tool from Making Memories to create a half circle slot to hold my flap down. Finally I embellished it with an additional plastic snowflake and ribbon bow, and added some rub-ons to the tin.

Finished size 5.5" x 5".
Want to see more? Check out my online portfolio!

Sunday, December 23

HP's Activity Center

I found another great website with hundreds of FREE print projects. It's HP's Activity Center and right now they're featuring a whole bunch of great holiday downloads, including these fun 3D Holiday Ornaments.

Stuck for some last minute gift wrap and tags? I found these cute tags and stickers on HP's site. You can also print out your own gift wrap and boxes. Not to mention dozens of creative cards and paper for your very own family newsletter. Already done with all of your holiday cards and gifts? HP also has calendars and party kits for the New Year!

Happy Holidays Everyone!
~ Angela

Tuesday, December 18

Holiday Boxes and Bows... Oh My!

Here are a couple of gift boxes that I created for the holidays. I got my inspiration from a number of different online resources. The box is your basic origami box. There are a many great websites offering instructions on how to create this box. To find them, just enter "origami box" into your favorite search engine. One of the best is Kristina Werner's video tutorial which can be found on her blog. I chose one patterned paper and one solid paper to create my box. Then I tied the two color schemes together with my bow and accents.

The paper bow is my own variation of the tutorial which can be found on
SplitcoastStamper's website. However, instead of cutting and gluing 13 individual loops, and using multiple brads, I used fewer strips of longer paper and just one long-pronged brad.
Here's how...

Materials:
  • 6" x 12" piece of double sided paper
    (Note - heavier double sided cardstock will also work,
    but
    it will be more difficult to manipulate)
  • brad/paper fastener with long prongs
    (you can find these at your local office supply store)
  • paper piercer (or a thumbtack, for an inexpensive alternative)
Instructions:
  1. Cut eight 10" x 3/4" strips and one 4-1/2" x 7/8" strip of the double-sided paper.
    Tip: First cut your paper into two 6" x 10" and 6" x 2" rectangles. Cut the eight strips from the larger piece and the small strip from the 2" piece.
  2. Pierce 3 holes down the center of each of the 10" strips: 1/2" from each end and one in the middle.
  3. Pierce 2 holes in the 4-1/2" strip: 1/2" from both ends.
  4. With the prongs facing up, place the end hole of one of the 10" strips on the brad, inside pattern side up. Using a figure eight pattern, place the center and second end holes on the brad. Always keep the inside pattern facing up on the brad.
  5. Rotate 90 degrees and repeat step 4 so that the loops form a plus sign.
  6. Continue with the remaining 10" strips, rotating so that each new loop falls in between existing loops.
  7. Finish with a single loop made from 4-1/2" strip. Bend prongs to secure bow.
Bonus Tip! Since I knew that I would be attaching this bow to my paper box, I pierced a whole in the center of the lid of my box. I then inserted the brad from the inside of the lid so that the prongs protruded up on the outside of my box. Next I put my box lid over a jar, so that I would have a stable surface to create my bow. Once I finished my bow, it was already neatly attached to my box! Voila!

: : :

I based the design for my personalized tag on Nichole Heady's Mini Gift Cards. I love the simplicity and elegance of Nichole's design! Since I didn't have her stamps, I decided to use a graphic from a Digital Kit instead. I chose the holly leaves from Kate Teague's "Berry Days" Kit which I downloaded from the Two Peas in a Bucket website. I finished it off using Font Diner's Rickles font, my Marvy Uchida Mega Scalloped Square Punch, and some ribbon. I attached my gift tag to my bow using a small safety pin.

Finished size of boxes approx. 4.25" square x 2.75", exclusive of trim.
Bow is approximately 4-1/4" across.
Additional photos in my online portfolio.

Wednesday, December 12

Holiday Frame Ornaments

Here is a super quick and easy (and inexpensive!) holiday idea that would be a great project to do with the kids. I designed them as ornaments, but they would also be wonderful as package decorations and as gift tags.

Here are the basic instructions for the base:
  1. Cut a 3" x 6" piece of patterned cardstock.
    (Heavier cardstock works better for this project than the lighter weight patterned paper.)
  2. Fold in half to form a 3" square.
  3. Using a 1-3/8" square punch, cut out a hole in the center of one of the squares.
    Note: I really like using EK Success' square punch for this project, because I can simply insert my paper all the way into the punch until it stops. And then I center the punch visually on the paper and squeeze. That's it! No measuring required! Of course, if you do not have this punch, you can cut out the square with a craft knife or scissors.
  4. Glue your 1.5"-1.75" square photo in place.
  5. Glue the frame closed.
  6. Attach wire or ribbon to hang ornament.
That's it! Now it is up to you to embellish as desired. My only caution to you is to not go too crazy with the embellishments, especially the heavier ones, as the base is only paper. And also keep in mind that you want your ornament to hang straight, so you may need to balance out an embellishment on one side, with an additional one on the other side.

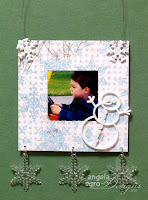
Blue Snowflakes Frame Ornament
Finished Size approx 3" x 4.25", exclusive of wire hanger.

I attached snowflake brads to the top corners and wrapped the ends of a length of wire around them to form the hanger. You could also attach eyelets and thread ribbon through.

I then added a playful plastic snowman using mini glue dots. Finally I attached three plastic snowflakes using jump rings. I really like the dangling effect that I achieved here!


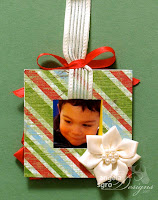
Red & Green Striped Frame Ornament
Finished Size approx 3" x 3.25", exclusive of ribbon.

I chose to have a photo on both sides of this ornament. Simply do steps 3 & 4 on both sides of your cardstock.

I added a sheer cream ribbon as a hanger. To attach it, I carefully cut a slot through the top of my photos, where the pictures meet the frame. I then slid my ribbon through.

Hint: use a thin piece of metal or plastic to help guide your ribbon through the slot.

I then knotted my ribbon at the top to form a loop and tied a red bow around my ribbon at the top of the frame. Finally I adhered a ribbon poinsettia to each side of the frame using glue dots.

Enjoy!

Friday, December 7

"CHARMED, I'm sure..."

Speaking of News and Newsstands...
I just got my copy of the Dec/Jan 2008 issue of Paper Trends magazine. And guess what I found on pages 94-95??? My "Charmed Birthday" creations! Woo Hoo! It's the very first project in their section on charms. I'm not permitted to post pics of my project until after the magazine leaves the newsstands, but I did manage to sneak in a tiny peak... (see inset at right)

I hope this project inspires you for your next birthday party! Or perhaps for a bridal or baby shower?

EXTRA! EXTRA! Subscriptions Now Available!

Good News! After multiple requests (and a couple hours of research), I have added an e-mail subscription link to my blog. You can now get my posts sent right to your mailbox. That's right! All my brandy-new rantings and ravings, my stream-of-consciousness jabbering, and (oh yeah!) my paper craft projects delivered to right your computer's doorstep, all fresh and hot from the oven!

Still interested? Just enter your email address in the form on the right. You may regret this...

p.s. Prefer to get the latest scoop delivered to your Reader? Subscribe to my feed by following the Atom link on the very bottom of the page...

Editor's Note:
If you find you are not getting my email subscriptions sent to your inbox, please check your spam folder.

Tuesday, December 4

Holiday Tin Ornaments

Here are some ornaments that I made for a Paper Crafts swap. I created a total of 24 ornaments, using four different designs. This was a fun and simple project using 2.5 oz tin containers with clear lids and images that I cut out of gift tags and attached using foam tape for added dimension. (Hint: this would also work really well with stamped or paper pieced images! Or maybe a photograph?!?!) I finished it off with some fake snow, a ribbon loop for hanging, and some rub-ons on the lids.

Finished Size approx 2.75" circle x 1", exclusive of ribbon.
Additional images in my online portfolio.