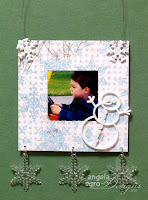
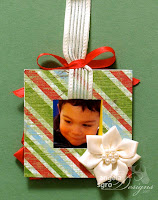
 Here is a super quick and easy (and inexpensive!) holiday idea that would be a great project to do with the kids. I designed them as ornaments, but they would also be wonderful as package decorations and as gift tags.
Here are the basic instructions for the base:
 Cut a 3" x 6" piece of patterned cardstock.
(Heavier cardstock works better for this project than the lighter weight patterned paper.)- Fold in half to form a 3" square.
- Using a 1-3/8" square punch, cut out a hole in the center of one of the squares.
Note: I really like using EK Success' square punch for this project, because I can simply insert my paper all the way into the punch until it stops. And then I center the punch visually on the paper and squeeze. That's it! No measuring required! Of course, if you do not have this punch, you can cut out the square with a craft knife or scissors. - Glue your 1.5"-1.75" square photo in place.
- Glue the frame closed.
- Attach wire or ribbon to hang ornament.
 Blue Snowflakes Frame Ornament
Finished Size approx 3" x 4.25", exclusive of wire hanger.
I attached snowflake brads to the top corners and wrapped the ends of a length of wire around them to form the hanger. You could also attach eyelets and thread ribbon through.
I then added a playful plastic snowman using mini glue dots. Finally I attached three plastic snowflakes using jump rings. I really like the dangling effect that I achieved here!
 Red & Green Striped Frame Ornament
Finished Size approx 3" x 3.25", exclusive of ribbon.
I chose to have a photo on both sides of this ornament. Simply do steps 3 & 4 on both sides of your cardstock.
I added a sheer cream ribbon as a hanger. To attach it, I carefully cut a slot through the top of my photos, where the pictures meet the frame. I then slid my ribbon through.
Hint: use a thin piece of metal or plastic to help guide your ribbon through the slot.
I then knotted my ribbon at the top to form a loop and tied a red bow around my ribbon at the top of the frame. Finally I adhered a ribbon poinsettia to each side of the frame using glue dots.
Enjoy!
3 comments:
I love your frames. Thanks for posting the tutorial too.
What a great project. Thanks for sharing the directions.
I've just had a chance to sit down and make a frame using your directions. Thank you they were so easy to follow. I'll be all set up now the Xmas 2008.
Post a Comment